Self-Hosting Home Assistant: Local Smart Home Control in 2026
Self-host Home Assistant for a private, local smart home in 2026: which hardware to buy, HAOS vs Docker, Zigbee vs Matter, and the SD-card mistake to avoid.
⚡ Why Self-Host Your Smart Home
Cloud smart homes work great — until a server goes down, a subscription appears, or a company discontinues the product your lights depend on. Home Assistant flips that: it runs entirely on hardware in your home, so your automations keep working during an internet outage, your data never leaves your network, and there are no mandatory fees. It connects over 1,000 integrations — Zigbee bulbs, Z-Wave locks, Matter sensors, even Tesla and Spotify — into one app you control. This guide covers the hardware, the install, and the protocol choices that trip up newcomers.
Your smart home shouldn’t depend on someone else’s server farm. When the cloud hub behind your lights has an outage, gets a new subscription, or is quietly discontinued, you’re stuck. Home Assistant is the answer the self-hosting world settled on: a free, open-source platform that runs locally, keeps your data in your house, and works even when the internet doesn’t. This guide walks through choosing hardware, the two install methods, and picking the right device protocol — the decision that saves or wastes the most money.
Why Local Beats Cloud for a Smart Home
The case for self-hosting your smart home is unusually strong, because cloud smart homes have real, recurring failure modes that local control simply doesn’t:
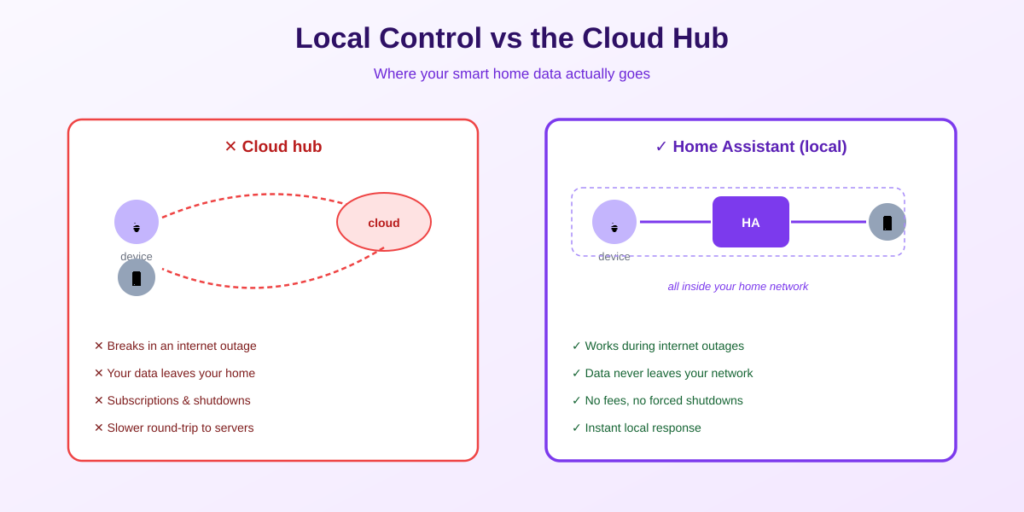
- It works offline. Automations run on your hardware, so a home internet outage doesn’t leave you unable to turn on a light. Cloud hubs often go dumb the moment they lose connection.
- Your data stays home. Motion, presence, camera, and usage data never leave your network unless you choose to share it — no company mining when you’re home or asleep.
- No subscriptions, no shutdowns. The core software is free forever, and no manufacturer can brick your setup by ending a cloud service you depended on.
- Everything in one app. Over 1,000 integrations fold Philips Hue, Nest, Z-Wave locks, Matter sensors, and more into a single interface — no juggling five manufacturer apps.
💡 The one optional cost: Home Assistant Cloud (Nabu Casa) is $6.50/month and buys easy remote access plus Alexa/Google voice integration — and it funds the project’s development. It’s entirely optional: you can get remote access for free with a VPN like Tailscale, and there’s a fully local voice assistant (Assist) that never sends audio to the cloud.
Choosing Your Home Assistant Hardware
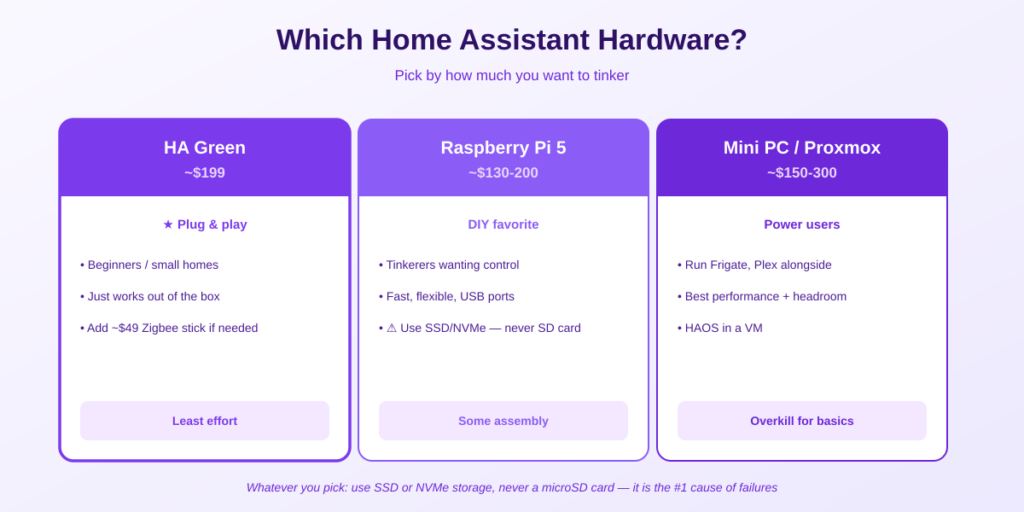
Home Assistant runs on almost anything, but three paths cover nearly everyone in 2026. The right one depends on how much you want to tinker:
| Option | Cost | Best for | Trade-off |
|---|---|---|---|
| HA Green | ~$199 | Beginners who want plug-and-play | No built-in Zigbee radio (add ~$49 stick) |
| Raspberry Pi 5 (DIY) | ~$130-200 all-in | Tinkerers wanting control + power | You flash the OS and pick storage |
| Mini PC / Proxmox | ~$150-300 | Power users running Frigate, etc. | More setup; overkill for basics |
⚠️ Two hardware notes that matter in 2026. First: the Home Assistant Yellow was discontinued in late 2025 — if you don’t already own one, choose the Green or a Pi 5 instead. Second, and critical: never run Home Assistant from a microSD card on a Raspberry Pi. Constant database writes wear cards out, and SD-card failure is the number-one cause of Pi-based Home Assistant crashes. Use a USB SSD or an NVMe drive via a HAT. This single choice prevents the most common disaster.
The Raspberry Pi and mini PC guides cover the DIY hardware in depth.
The Two Ways to Install Home Assistant
Home Assistant officially supports two install methods, and the difference matters more than beginners expect:
HAOS — the full experience (recommended)
Home Assistant OS is a purpose-built operating system that runs Home Assistant plus its Supervisor. That Supervisor is the whole point: it gives you the add-on store (one-click installs of Zigbee2MQTT, Mosquitto, Frigate, and more), a built-in backup manager, and one-click updates. For a dedicated Green, Pi, or a VM, this is the recommended path — it’s the easiest to live with.
Docker container — for existing servers
You can also run Home Assistant as a plain Docker container on a server you already have. You get the core experience, but without the Supervisor — meaning no add-on store, no built-in backup manager, and no one-click updates. You manage updates and helper services (like the Matter server or Zigbee2MQTT) yourself through Docker Compose. Great if you already run a home server and are comfortable with containers; more work otherwise.
Running it in a container? The Docker for self-hosting guide covers the workflow, and Proxmox is the popular way to run HAOS as a VM.
Getting Started: The First Install
STEP 1 Flash or Plug In
For an HA Green, just plug in power and ethernet. For a Pi or mini PC, use the Raspberry Pi Imager or Balena Etcher to flash the Home Assistant OS image to your SSD, then boot from it.
STEP 2 Run the Onboarding Wizard
From a laptop on your main network, browse to homeassistant.local:8123. Wait a few minutes for the first-boot setup, then create your admin account — treat this account as the keys to your entire home. (If the .local address won’t resolve, your phone may be on a guest network or separate VLAN; use a laptop on the main LAN.)
STEP 3 Add Your Devices
Home Assistant auto-discovers many Wi-Fi devices on your network. For Zigbee, Z-Wave, or Matter devices, go to Settings → Devices & Services → Add Integration, pick the right protocol, and follow the prompts to pair each device.
STEP 4 Set Up Backups Immediately
Before you build anything, turn on backups under Settings → System → Backups. After major changes, download a copy to an external drive. A smart home is a lot of configuration to lose — back it up from day one.
Zigbee vs Z-Wave vs Matter: Which Protocol?
This is the choice that most affects your device costs and options. You don’t need to pick just one, but it helps to understand them:
- Zigbee — the default choice. The widest device selection by far, cheap, and reliable. It forms a self-healing mesh where every mains-powered device extends the range. A USB coordinator (around $20, like the SONOFF dongle) connects directly to Home Assistant — no bridge, no hub, no cloud.
- Z-Wave — better range, higher cost. Runs at a lower frequency that penetrates walls and floors better than Zigbee. The trade-off: devices typically cost 2-3x their Zigbee equivalents.
- Matter / Thread — the future-proof pick. The new industry standard backed by Apple, Google, and Amazon, so Matter devices work across platforms. Support in 2026 is real but the device selection (~300 certified devices) is still growing. Good for new purchases; no need to replace working Zigbee gear.
- Wi-Fi — convenient but often cloud-tied. Cheap Tuya, Kasa, and Govee devices connect over Wi-Fi, but many require a cloud account. For local control, flash open firmware like ESPHome or Tasmota where possible.
🔌 Practical tip: For a first smart home, start with Zigbee via a $20 USB coordinator and the built-in ZHA integration — it handles about 95% of use cases with the least fuss. Plug the coordinator into a USB extension cable, not directly into a Pi: USB 3.0 ports cause interference that leads to Zigbee packet loss. Add Matter later as you buy new devices.
Going Further: Privacy and Power Features
Once the basics work, Home Assistant’s local-first design unlocks things cloud hubs can’t. Frigate adds local AI camera object detection (people, cars, packages) using an inexpensive Coral TPU — no footage sent to anyone. The built-in Assist voice assistant runs speech recognition on your own hardware, so voice control never reaches Amazon or Google. And for secure remote access to your dashboard from anywhere, pair it with a VPN instead of exposing it to the internet.
Reach your dashboard safely from anywhere with Tailscale, and if you expose it via a domain, put it behind HTTPS with a reverse proxy.
Frequently Asked Questions About Home Assistant
Is Home Assistant free?
Yes. The core Home Assistant software is completely free and open source under the Apache 2.0 license, with no subscription and no device limits. The only optional cost is Home Assistant Cloud (Nabu Casa) at $6.50/month, which adds easy remote access and Alexa/Google voice integration and funds development — but you can replace it with a free VPN and the built-in local voice assistant.
What hardware do I need for Home Assistant?
Three good options in 2026: the Home Assistant Green (~$199, plug-and-play, best for beginners), a DIY Raspberry Pi 5 ($130-200 all-in, more control and power), or a mini PC / Proxmox setup ($150-300, best for power users running extras like Frigate). Whatever you choose, use SSD or NVMe storage — never a microSD card, which is the top cause of failures.
Should I use HAOS or Docker for Home Assistant?
For most people, Home Assistant OS (HAOS). It includes the Supervisor, which gives you the add-on store, one-click updates, and a built-in backup manager — far easier to live with. Use the Docker container method only if you already run a home server and want Home Assistant alongside other containers; it works but drops the add-on store and one-click updates, leaving more for you to manage.
Does Home Assistant work without internet?
Yes — that’s a core advantage. Because automations run locally on your hardware, they keep working during an internet outage. Local devices (Zigbee, Z-Wave, Matter-over-Thread) respond normally offline. Only features that reach outside your home — cloud integrations, remote access, and some voice assistants — need the internet, and even voice can run locally with the built-in Assist.
Zigbee or Matter — which should I choose for Home Assistant?
For most people starting out, Zigbee. It has the widest device selection, is cheap, and connects directly via a ~$20 USB coordinator with no cloud. Matter is the future-proof standard backed by Apple, Google, and Amazon, but its device selection is still growing in 2026. Buy Matter for new devices if you want cross-platform compatibility; keep using Zigbee gear you already own.
Can I run Home Assistant on a Raspberry Pi?
Yes, a Raspberry Pi 5 is a community favorite — fast, well-supported, and flexible. The critical rule: don’t run it from a microSD card, because constant database writes wear cards out and cause the most common Home Assistant failures. Use a USB SSD or NVMe drive via a HAT instead. Budget $130-200 all-in for the Pi, storage, case, and power supply.
Is Home Assistant hard to set up?
The basics are genuinely easy in 2026 — plug in an HA Green or flash a Pi, run the onboarding wizard, and pair devices through a menu. The depth comes later: advanced automations, add-ons, and integrations have a real learning curve. But you can have a working smart home controlling lights and sensors in your first hour, then grow into the powerful stuff at your own pace.
The Bottom Line
🏠 Takeaway: Self-hosting Home Assistant gives you a smart home that works on your terms, not a company’s — local control, full privacy, offline reliability, and no mandatory fees. Start with reliable hardware (an HA Green to keep it simple, or a Pi 5 with SSD storage, never a microSD card), install HAOS for the easiest experience, begin with Zigbee for the widest cheap device support, and set up backups before you build anything. The learning curve is real, but so is the payoff: a smart home that keeps working when the internet — and the cloud — doesn’t.
Run it on a Raspberry Pi or mini PC, keep it backed up with a proper backup strategy, and explore more in 10 self-hosted apps.
How This Guide Was Researched
- Home Assistant’s local-first architecture, 1,000+ integrations, and Apache 2.0 licensing verified against the official Home Assistant project
- 2026 hardware details (HA Green ~$199, Pi 5 DIY $130-200, HA Yellow discontinued late 2025) and the microSD-card failure warning cross-referenced across multiple current guides
- Install methods (HAOS with Supervisor vs Docker without add-on store) and protocol guidance (Zigbee/Z-Wave/Matter) confirmed across independent 2026 sources
- Nabu Casa Cloud pricing ($6.50/mo, optional) and local alternatives (VPN remote access, local Assist voice) drawn from the official documentation
Home Assistant updates monthly, so always check the official Home Assistant site for current hardware and install steps. Home Assistant has no affiliate program; this guide earns nothing from it.
Questions about your setup? Email hello@selfhostlife.com.
Product links on this site are plain links. We earn nothing from them — see our disclosure policy.