Pi-hole Setup: Block Ads on Every Device (2026)
Pi-hole setup in about 15 minutes: block ads and trackers for every device on your network at the DNS level, on Docker or a Raspberry Pi. Current v6 steps.
⚡ What You’ll Build
One small server that blocks ads, trackers, and telemetry for every device on your network — phones, smart TVs, game consoles, IoT gadgets — with nothing installed on those devices. Pi-hole self-hosting is widely called the ‘gateway drug to self-hosting’ because it delivers instant, visible results, runs on almost any hardware, and sets up in about 15 minutes. This guide covers how it works, how to install it the current (v6) way, and the one trap that catches everyone.
Browser ad blockers only protect that browser. A Pi-hole setup protects your entire network at once — every phone, laptop, smart TV, and IoT device — by blocking ads and trackers at the DNS level, before they ever download. It’s free, open source, runs on hardware as humble as a Raspberry Pi, and is genuinely the most satisfying first self-hosting project because the results are immediate and visible. Here’s how to set it up properly in 2026.
What Is Pi-hole and How Does It Work?
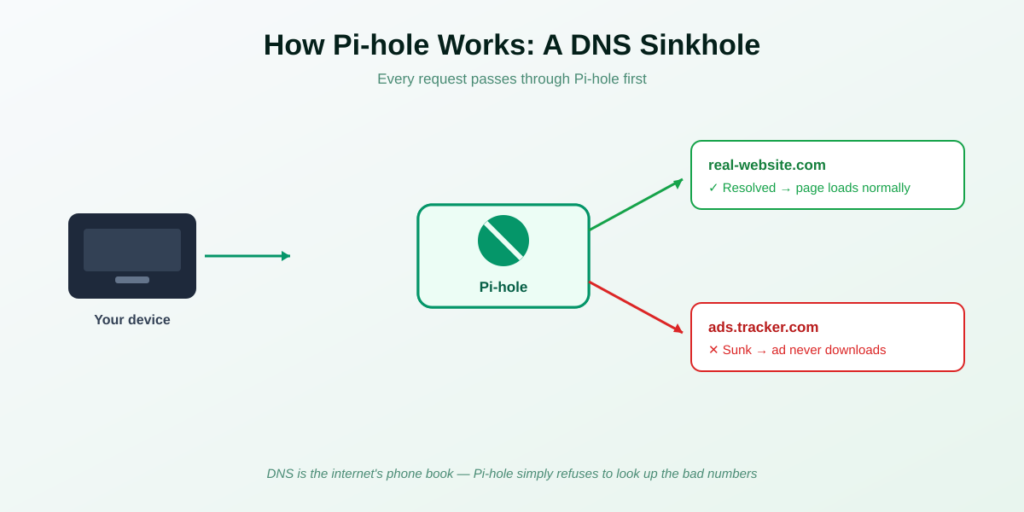
Pi-hole is a free, open-source DNS sinkhole — a network-wide ad and tracker blocker. To understand it, you need one idea: DNS is the internet’s phone book. Every time a device loads a page, it asks a DNS server to turn names like ‘ads.example.com’ into IP addresses. Pi-hole becomes that DNS server for your network.
When a device requests a normal website, Pi-hole returns the real address and the page loads. But when a device requests a known ad or tracking domain, Pi-hole returns nothing — it ‘sinks’ the request into a black hole, so the ad never downloads. Because this happens at the network level, it works everywhere:
- Every device, zero setup. Phones, smart TVs, consoles, and IoT gadgets are all covered without installing anything on them.
- Blocks what browser extensions can’t. Ads inside mobile apps, smart-TV interfaces, and device telemetry — places a browser plugin can never reach.
- Faster browsing. Ads aren’t downloaded at all, and Pi-hole caches DNS results locally, so pages often feel snappier.
- Less tracking and telemetry. It blocks the ‘phone home’ endpoints that Windows, Android, and smart devices constantly contact.
✓ Pi-hole v6 (what’s current): Pi-hole v6, released February 2025 and current through 2026, was a major rewrite. The old lighttpd web server is gone — FTL now has its own built-in web server and REST API, all settings live in one pihole.toml file, and the Docker image moved to Alpine Linux (shrinking from 113 MB to about 38 MB). If you follow an older tutorial, the variable names won’t match. This guide uses v6.
Why Self-Host Pi-hole?
Beyond blocking ads, Pi-hole gives you something a subscription ad blocker never can — control and insight into your own network:
- It’s completely free. No subscription, no per-device fee, forever.
- A dashboard for your network. See exactly what every device is querying and how much is being blocked — often eye-opening for smart-home gear.
- Privacy by default. Pair it with Unbound and your DNS queries go straight to the root servers, so not even Cloudflare or Google sees them.
- It teaches you self-hosting. Small, safe, and immediately rewarding — the perfect on-ramp to running your own services.
It’s the project I recommend starting with on a Raspberry Pi, and a natural pairing with Tailscale for ad blocking on the go.
What You Need
Pi-hole is famously light. You need very little:
- Almost any always-on device. A Raspberry Pi, an old laptop, a NAS, a mini PC, or a VPS. Pi-hole idles around 80 MB of RAM, so even ancient hardware works.
- A static IP for the server. This is essential — your whole network will point its DNS at this address, so it must never change. Set a static IP or a DHCP reservation in your router.
- Access to your router settings. So you can hand out Pi-hole as the network’s DNS server (the step that protects every device automatically).
How to Self-Host Pi-hole (Docker, v6)
Docker is the cleanest way to run Pi-hole in 2026. Here’s the path from nothing to network-wide blocking.
STEP 1 Give the Server a Static IP
In your router, reserve a fixed IP for your Pi-hole machine (e.g. 192.168.1.100). Everything depends on this address staying constant, so do this first.
STEP 2 Install Docker
If Docker isn’t already installed, use the official script:
curl -fsSL https://get.docker.com | shNew to containers? See the Docker for self-hosting guide first.
STEP 3 Create the Compose File
Make a docker-compose.yml using the official pihole/pihole image. Pin a specific version tag rather than ‘latest’ (v6 has shipped breaking changes between releases). The key pieces are the DNS ports (53 TCP and UDP), the web admin port (80), a strong admin password via the FTLCONF_webserver_api_password variable, and a volume mapping ./etc-pihole to /etc/pihole so your settings survive restarts.
image: pihole/pihole:2026.07.2 ports: 53:53/tcp, 53:53/udp, 80:80/tcp volumes: ./etc-pihole:/etc/pihole
STEP 4 Start Pi-hole and Log In
Bring it up:
sudo docker compose up -dThen open http://YOUR-SERVER-IP/admin in a browser and log in with the password you set. You’ll see the dashboard — but nothing is using Pi-hole yet. That’s the next step.
STEP 5 Point Your Network at Pi-hole
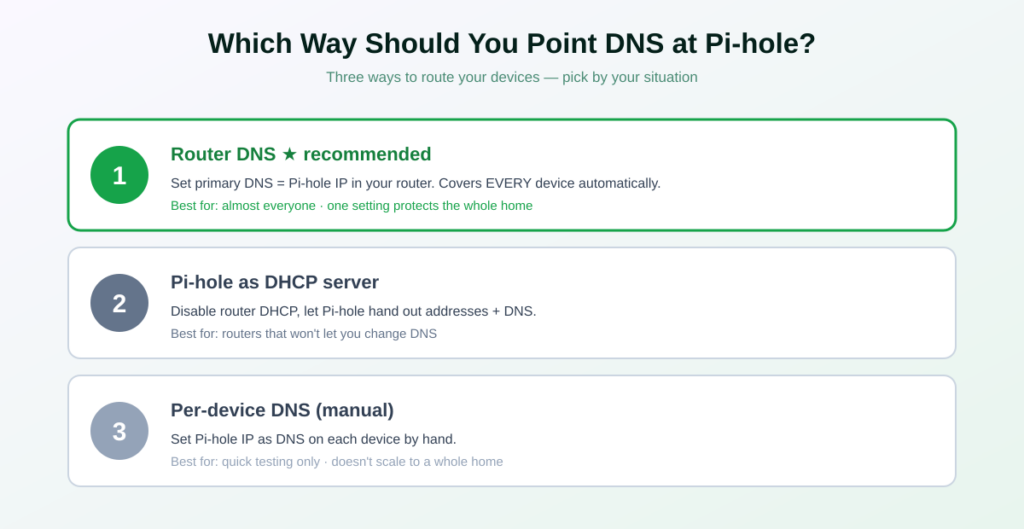
This is what actually turns on blocking. In your router’s DHCP/DNS settings, set the primary DNS server to your Pi-hole’s IP address. Devices pick it up as they renew their DHCP lease (reconnect Wi-Fi to force it).
⚠️ Leave the secondary DNS BLANK. This is the trap that catches everyone. If you set a secondary DNS like 8.8.8.8 alongside Pi-hole, your devices will randomly use it and bypass Pi-hole entirely — giving you inconsistent, confusing results. Use only your Pi-hole’s IP. If you want redundancy, run a second Pi-hole and list that instead, never a public DNS.
Can’t change your router’s DNS (locked ISP equipment)? You can set Pi-hole’s IP as the DNS on each device manually, or use Pi-hole’s built-in DHCP server (disable your router’s DHCP first).
STEP 6 Add Good Blocklists
Pi-hole ships with StevenBlack’s list (~100,000 domains), a solid base. In 2026, two community lists are worth adding: HaGeZi (tiered, the most actively maintained) and OISD (strict no-false-positives policy — best if family members complain when things break). Add them in Settings, then update Gravity to apply.
Two Upgrades Worth Making
Unbound for full DNS privacy
By default Pi-hole forwards lookups to Cloudflare or Google. Add Unbound as your upstream resolver and Pi-hole talks directly to the internet’s root servers instead — so no third party sees your browsing at all. It’s the single best privacy upgrade for a Pi-hole.
Ad blocking away from home
Pair Pi-hole with a VPN like Tailscale or WireGuard, and your phone keeps using Pi-hole on cellular data too — blocking ads everywhere and even saving some bandwidth on metered plans.
Honest Caveats
Pi-hole is excellent, but go in knowing two things:
- It’s a single point of failure. Because Pi-hole is your DNS, if it goes down your whole network loses internet until you fix it or switch DNS back. For an always-online household, run a second Pi-hole as backup.
- Occasional false positives. Now and then a blocklist will break a legitimate site or app. The fix is quick — allow the domain in the dashboard — but it’s the one bit of maintenance you’ll occasionally do. Starting with OISD minimizes this.
Keep your Pi-hole server itself secure with the basics in the server security guide — and never expose its DNS port to the public internet.
Frequently Asked Questions About Pi-hole Self-Hosting
Is Pi-hole free?
Yes — Pi-hole is completely free and open source, with no subscription or per-device fee. The only cost is the hardware it runs on, which can be something you already own like a Raspberry Pi, old laptop, or NAS. It’s one of the highest-value free tools in self-hosting.
Does Pi-hole block ads on every device?
Yes, that’s its main strength. Because Pi-hole works at the DNS level for your whole network, it blocks ads and trackers on phones, smart TVs, game consoles, and IoT devices — including inside mobile apps and TV interfaces where browser extensions can’t reach — with nothing installed on those devices.
Does Pi-hole slow down my internet?
No — usually the opposite. Ads aren’t downloaded at all, so pages load faster, and Pi-hole caches DNS results locally, which can be quicker than your ISP’s distant DNS server. The blocking adds negligible latency on modern hardware.
What hardware do I need for Pi-hole?
Very little. Pi-hole idles around 80 MB of RAM and runs on almost any always-on Linux device — a Raspberry Pi, an old laptop, a NAS, a mini PC, or a VPS. Even hardware too old for anything else handles it easily. It does need a static IP on your network.
Pi-hole vs a browser ad blocker — what’s the difference?
A browser ad blocker only protects that one browser on that one device. Pi-hole protects every device on your network at once, including apps, smart TVs, and IoT gadgets that can’t run extensions. Many people run both: Pi-hole for network-wide coverage and a browser blocker for element-level hiding.
Can I use Pi-hole when I’m away from home?
Yes. Pair Pi-hole with a VPN such as Tailscale or WireGuard, point your phone’s DNS through the tunnel, and you’ll keep network-wide ad blocking on cellular data and public Wi-Fi too. It’s a popular combination for mobile privacy.
What happens if my Pi-hole stops working?
Because Pi-hole acts as your network’s DNS server, if it goes offline your devices can’t resolve domains and lose internet until it’s back or you switch DNS. To avoid this, run a second Pi-hole as a backup resolver — never list a public DNS as secondary, as that lets devices bypass blocking.
The Bottom Line
🛡️ Takeaway: Pi-hole self-hosting blocks ads, trackers, and telemetry across every device on your network — for free, on hardware as small as a Raspberry Pi, in about 15 minutes. Install it with Docker (v6), give it a static IP, point your router’s primary DNS at it, and leave the secondary DNS blank. It’s the single most rewarding first self-hosting project — you’ll see the results the moment you load your first ad-free page.
New to this? Start with the beginner guide to self-hosting, run Pi-hole on a Raspberry Pi, and add Tailscale for blocking on the go.
How This Guide Was Researched
- Pi-hole’s DNS-sinkhole mechanism and network-wide coverage verified against the official Pi-hole project and multiple 2026 guides
- v6 changes (FTL built-in web server, single pihole.toml, Alpine image ~38 MB, released February 2025) confirmed across independent sources
- Setup steps, the blank-secondary-DNS rule, and blocklist recommendations (StevenBlack, HaGeZi, OISD) cross-referenced across current Docker and Raspberry Pi walkthroughs
- Resource use (~80 MB idle) and Unbound privacy upgrade drawn from multiple 2026 deployment guides
- The pinned image tag
pihole/pihole:2026.07.2is the newest release of thepi-hole/docker-pi-holerepository, published 7 July 2026 and checked 1 September 2026
Pi-hole updates regularly — check the official Pi-hole documentation and pin a current version tag before installing. Pi-hole has no affiliate program; this guide earns nothing from it.
Questions about your setup? Email hello@selfhostlife.com.
Product links on this site are plain links. We earn nothing from them — see our disclosure policy.