fail2ban and the Server Hardening That Actually Matters
Server hardening for self-hosters: what actually attacks your box, how to set up fail2ban properly, and the Docker trap that makes your firewall a decoration.
⚡ The short version
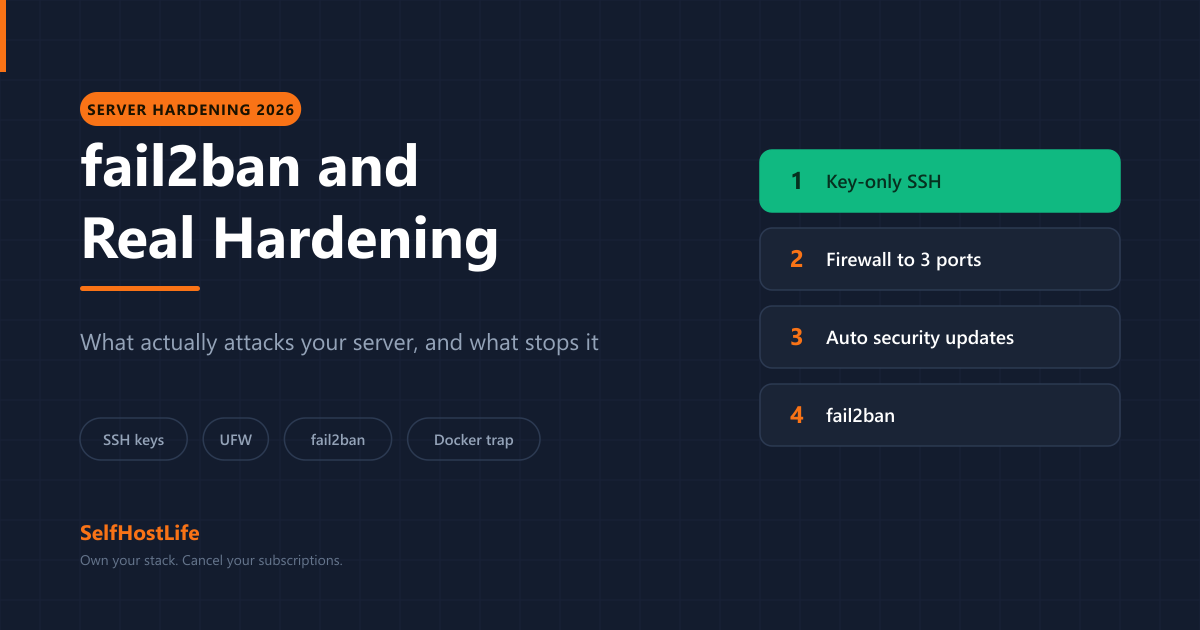
Four things do almost all the work: SSH keys instead of passwords, root and password login disabled, a firewall that only allows 22, 80 and 443, and unattended security updates. fail2ban sits on top of that, watching logs and blocking addresses that keep failing to log in. And one trap catches nearly everyone: UFW does not filter Docker's published ports, so a container you thought was firewalled may be open to the internet right now.
Point a server at the internet and it starts getting probed within hours. Not because anyone is interested in you — because scanners sweep the entire address space continuously, and a new host is a new entry in someone’s list. Server hardening for a self-hoster is not about defeating a targeted attacker. It is about not being the easiest box on the block, which takes about half an hour of work.
This guide covers what actually hits you, how to set up fail2ban properly, and the Docker behaviour that quietly undoes the firewall you thought you had.
What Is Actually Attacking You
Almost everything that reaches a small server is automated and undirected:
- SSH brute force. Bots trying
root,admin,ubuntu,piagainst every address they can reach, with password lists. This is the overwhelming majority of what you will see in your logs. - Known-vulnerability scanning. Requests for
/wp-login.php,/.env,/.git/config— hunting for a specific software flaw or a leaked credentials file, on every IP, all the time. - Exposed-service discovery. Scans for common ports — databases on 5432 and 3306, admin panels, anything answering that should not be public.
What is not attacking you: a person who has chosen your server. Targeted attacks are real but they are not what a home lab faces. The practical goal is to make the automated sweep move on, and that is a low bar cleared by four unglamorous settings.
The Four Things That Do the Work
These are covered step by step in the $5 VPS setup guide; here is what each one is actually for.
SSH keys instead of passwords. A key is far too long to guess. Once password authentication is off, SSH brute force cannot succeed regardless of how many attempts arrive. This single change removes the largest attack category outright.
Root and password login disabled. PermitRootLogin no and PasswordAuthentication no in /etc/ssh/sshd_config. Bots overwhelmingly target root; if it cannot log in at all, they are guessing at a door that does not open.
A firewall that allows almost nothing. Ports 22, 80 and 443, and nothing else. Every other service should be reachable only from inside the machine or over a VPN.
Unattended security updates. Most real compromises exploit a known flaw that had a patch available. Automatic security updates close that window without you remembering to.
⚠️ Test before you disconnect. When you disable password login, open a second terminal and confirm you can still get in with your key before closing the first one. Locking yourself out means recovering through your provider's console, which is a slow way to learn this lesson.
fail2ban: What It Does and What It Doesn’t
fail2ban watches log files. When an address fails to authenticate too many times in a set window, it adds a firewall rule blocking that address for a while, then removes it. That is the whole idea.
Be clear about what this buys. fail2ban does not make a weak password strong, and it does not patch a vulnerable application. If your SSH is already key-only, it adds almost no protection there — brute force was already impossible. Its real value starts when you expose something with its own login form, where a password can be guessed and rate-limiting is genuinely useful.
Setting it up
sudo apt install fail2ban -yDo not edit jail.conf — package updates overwrite it. Create /etc/fail2ban/jail.local, which takes precedence and survives upgrades:
[DEFAULT]
bantime  = 1h
findtime = 10m
maxretry = 5
backend  = systemd

[sshd]
enabled = true
Three numbers to understand: maxretry failures within findtime triggers a ban lasting bantime. The defaults above are sensible — five failures in ten minutes earns an hour out.
backend = systemd matters on Ubuntu 24.04 and other modern distributions, where SSH logs go to the systemd journal rather than /var/log/auth.log. Miss this and fail2ban watches a file that never changes, reports itself healthy, and bans nobody.
sudo systemctl enable --now fail2ban
sudo fail2ban-client status sshd
That last command is the one that tells the truth. It shows currently failed attempts, total banned, and the list of banned addresses. If the numbers stay at zero for days on an internet-facing box, something is misconfigured — the internet is not that quiet.
💡 Ban yourself out? Unban like this: sudo fail2ban-client set sshd unbanip 203.0.113.10. Worth knowing before you need it. Adding your own address to ignoreip in the [DEFAULT] section prevents the situation entirely.
Is fail2ban still maintained?
Yes, and the claim that it is abandoned is out of date. Version 1.1.1 was released on 15 August 2026, with repository activity within the following fortnight and around 18,500 GitHub stars as of 30 August 2026.
CrowdSec is the modern alternative — it shares attacker addresses across a network of installations, so you can block an address that has attacked someone else rather than waiting to be attacked yourself. It is actively developed (1.8.0, released 31 August 2026, around 14,700 stars). It is also more moving parts. For a single self-hosted server, fail2ban is the smaller tool that does the job; CrowdSec makes more sense once you are running several.
The Docker Trap: Your Firewall Is Not Doing What You Think
This is the part that undoes everything above, and it catches almost everyone.
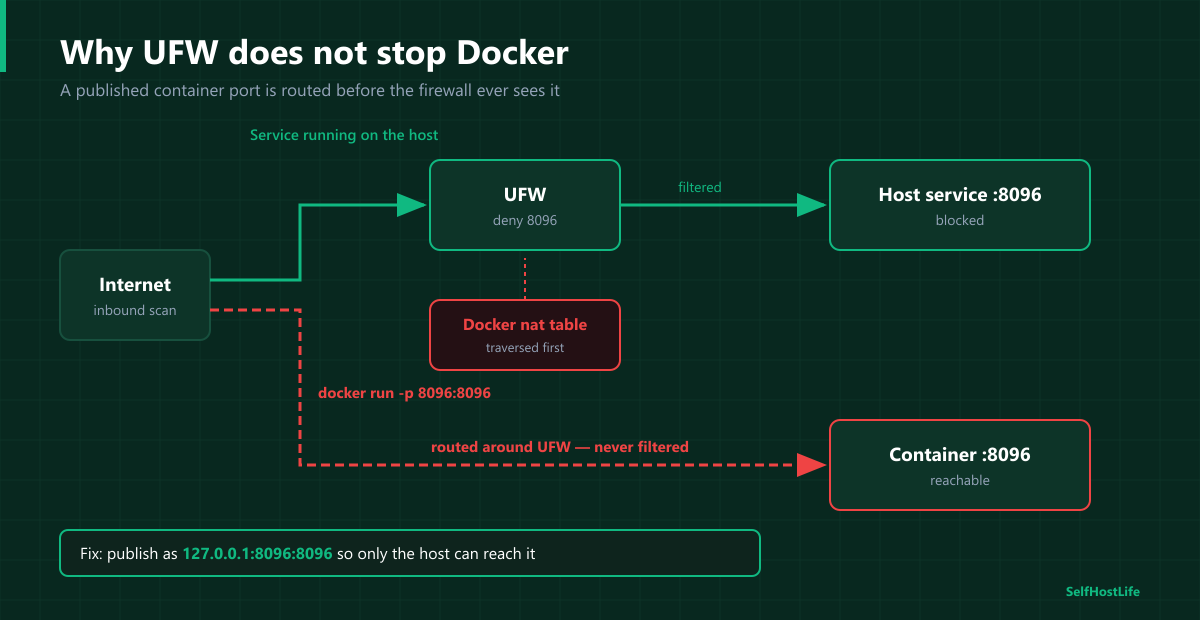
You set up UFW. You allowed 22, 80 and 443. You start Jellyfin with -p 8096:8096. You assume port 8096 is blocked, because you never allowed it.
It is open to the internet. Docker’s own documentation says so plainly:
"When you publish a container's ports using Docker, traffic to and from that container gets diverted before it goes through the ufw firewall settings."
Docker writes its own rules into the nat table, which packets traverse before they reach the chains UFW manages. Your firewall never sees the traffic, so it cannot deny it. ufw status will happily report the port as denied while the service answers the world.
The fix
Do not publish container ports to every interface. Bind them to localhost, and let a reverse proxy be the only thing that is public:
services:
  jellyfin:
    image: jellyfin/jellyfin
    ports:
      - '127.0.0.1:8096:8096'   # host-only, not the internet
With that binding, Docker’s rules only accept connections originating on the machine itself. Your reverse proxy reaches it fine; the internet cannot. Better still, drop the ports block entirely and put the container on a Docker network the proxy shares — then nothing is published at all.
Check what is actually exposed
Never trust ufw status on a machine running Docker. Check what is genuinely listening:
sudo ss -tulpnLook at the address column. 0.0.0.0:8096 means every interface, including the public one. 127.0.0.1:8096 means host-only. Then verify from outside the machine — your phone on mobile data, not your home Wi-Fi:
curl -m 5 http://YOUR_PUBLIC_IP:8096A timeout is what you want. A response means the port is open regardless of what your firewall claims.
The Move That Beats All of This
Every technique above is about surviving exposure. The stronger option is not being exposed.
If the only person who needs to reach your services is you, put them on a Tailscale network and close the public ports entirely. Brute force, vulnerability scanning, and exposed-service discovery all require reaching your server in the first place. Remove that and the whole category disappears — no bans to tune, no logs to watch.
Public exposure is for things other people genuinely need to reach: a blog, a shared media server, a link you send to family. Everything else is better off invisible.
💡 The honest priority order. 1) Key-only SSH. 2) Firewall down to 22/80/443. 3) Automatic security updates. 4) Bind Docker ports to localhost. 5) VPN instead of public exposure wherever you can. 6) fail2ban. That last position is deliberate — fail2ban is useful, but it is a filter on a door that the four items above have already locked.
Frequently Asked Questions About Server Hardening
What does fail2ban actually do?
It reads your log files, notices an IP address failing to authenticate repeatedly, and adds a firewall rule blocking that address for a while. It does not make a weak password strong or patch a vulnerable app. What it does is take the automated brute-force noise — which is most of what hits an internet-facing server — and turn it into a handful of blocked addresses.
Do I still need fail2ban if I use SSH keys?
Strictly, no. With password authentication disabled, brute force against SSH cannot succeed no matter how many attempts it makes. fail2ban then buys you quieter logs and less wasted CPU rather than protection. It earns its place properly once you expose anything with its own login page, because a web app’s password form is a real target in a way key-only SSH is not.
Is fail2ban still maintained in 2026?
Yes. Version 1.1.1 was released on 15 August 2026 and the repository had commits within the last week as of 30 August 2026. The common claim that the project is abandoned is simply out of date. CrowdSec is the newer alternative and is also actively developed, but fail2ban remains the smaller, simpler choice for a single server.
Does UFW protect my Docker containers?
No, and this catches almost everyone. Docker’s own documentation states that traffic to a published container port gets diverted before it reaches the ufw firewall settings. A container started with -p 8096:8096 is reachable from the internet even when UFW says that port is denied. Bind the port to 127.0.0.1 instead, and let a reverse proxy be the only thing that is public.
How do I check whether a port is really closed?
Do not trust ufw status — it does not know about Docker’s rules. Check what is actually listening with ss -tulpn, and then test from outside the machine entirely, using your phone on mobile data or an online port scanner. The only test that counts is one made from a network that is not yours.
Should I change the SSH port from 22?
It cuts log noise and nothing else. Automated scanners find services on non-standard ports quickly, so moving SSH to 2222 buys obscurity rather than security, and it breaks tools that assume the default. Key-only authentication is the change that actually matters; move the port afterwards if the quieter logs appeal to you.
What is the single most effective thing I can do?
Stop exposing services to the internet at all. A VPN like Tailscale gives you access from anywhere while leaving nothing publicly reachable, which removes the entire category of attack rather than filtering it. Public exposure is for things other people need to reach; everything else can live behind the VPN.
About This Guide
Checked against primary sources on 30 August 2026, with the CrowdSec release re-checked on 1 September 2026:
- fail2ban 1.1.1, released 15 August 2026, and CrowdSec 1.8.0, released 31 August 2026 — both via the GitHub releases API, along with star counts and last-commit dates
- The Docker firewall behaviour is quoted from Docker’s own packet filtering and firewalls documentation, not from secondary write-ups
backend = systemdis required on distributions that log SSH to the journal rather than to/var/log/auth.log, which includes current Ubuntu releases
Security advice ages. Check your distribution’s current documentation before following any guide, including this one.
Product links on this site are plain links. We earn nothing from them — see our disclosure policy.